RECIPE: THE BEST EVER CHOCOLATE BIRTHDAY CAKE WITH CHOCOLATE BUTTERCREAM FROSTING

Nothing says party like cake... and for me, nothing says delicious like a homemade chocolate cake. I've used this recipe for so many years, I cannot remember where I first got it. I know it did not come from my mother because she rarely made cakes and because my father didn't like chocolate, she certainly never made a chocolate cake. I started making this cake when I was in high school for parties I'd have at my house. There may have been a bakery in our neighborhood in those days but I never went to it because we made everything from scratch. There was a time when I made 7-Minute Icing for this chocolate cake but 7-minute icing is finicky and people seem to like the chocolate on chocolate better.

Make sure to use fresh baking powder and baking soda so you get a nice, fluffy cake.

PERFECT CHOCOLATE BIRTHDAY CAKE

INGREDIENTS

2 cups granulated sugar

1 3/4 cups all-purpose flour

3/4 cup cocoa powder

1 1/2 teaspoons baking soda

1 1/2 teaspoons baking powder

1 teaspoon kosher salt

2 large eggs

1 cup whole milk

1/2 cup vegetable oil

2 teaspoons pure vanilla extract

1 cup boiling water

1 recipe Chocolate Buttercream Frosting (recipe follows)

DIRECTIONS:

Heat oven to 350°F. Grease and flour three 8-inch round baking pans. (You can use Baker's Joy but I prefer the outcome using the grease-flour method)

Sift together the sugar, flour, cocoa, baking soda, baking powder and kosher salt and add it to the bowl of your mixer. With the mixer on low, add the eggs, one at a time. Add the milk, oil, and vanilla and beat on medium speed for 2 minutes. Remove from the stand. Stir in the boiling water (the batter will be thin). Pour the batter into the prepared pans.

Bake 30 to 35 minutes or until wooden pick inserted in center comes out clean. Cool 10 minutes; remove from pans to wire racks. Allow to cool completely before icing with the Perfect Chocolate Buttercream Frosting recipe below.

(For a sheet cake, use a 13x9x2 pan and bake for 35-40 minutes)


CHOCOLATE SWISS MERINGUE BUTTERCREAM

A Swiss buttercream is made using egg whites and not just butter (or shortening as some old recipes call for) to make it extra fluffy and lighter than a butter only buttercream. I like both but wanted to share this one-- or you can make traditional buttercream using just butter, powdered sugar, and chocolate. The one on the Hershey's Cocoa box is perfect. Can't go wrong with that!

INGREDIENTS

1 pound bittersweet chocolate

12 ounces semisweet chocolate

3/4 cup egg whites (4-5 extra-large eggs), at room temperature

1 1/2 cups granulated sugar

1/4 teaspoon cream of tartar

3/4 teaspoon kosher salt

1 1/2 pounds unsalted butter, room temperature

2 teaspoons pure vanilla extract

DIRECTIONS:

Chop the chocolates and place them in a heat-proof bowl set over a pan simmering water. Stir until melted and set aside until cooled to room temperature.

Mix the egg whites, sugar, cream of tartar, and salt in the bowl of an electric mixer fitted with a whisk attachment. Place the bowl of egg whites over the pan of simmering water and heat the egg whites until they are warm to the touch, about 5 minutes. Return the bowl to the electric mixer and whisk on high speed for 5 minutes, or until the meringue is cool and holds a stiff peak.

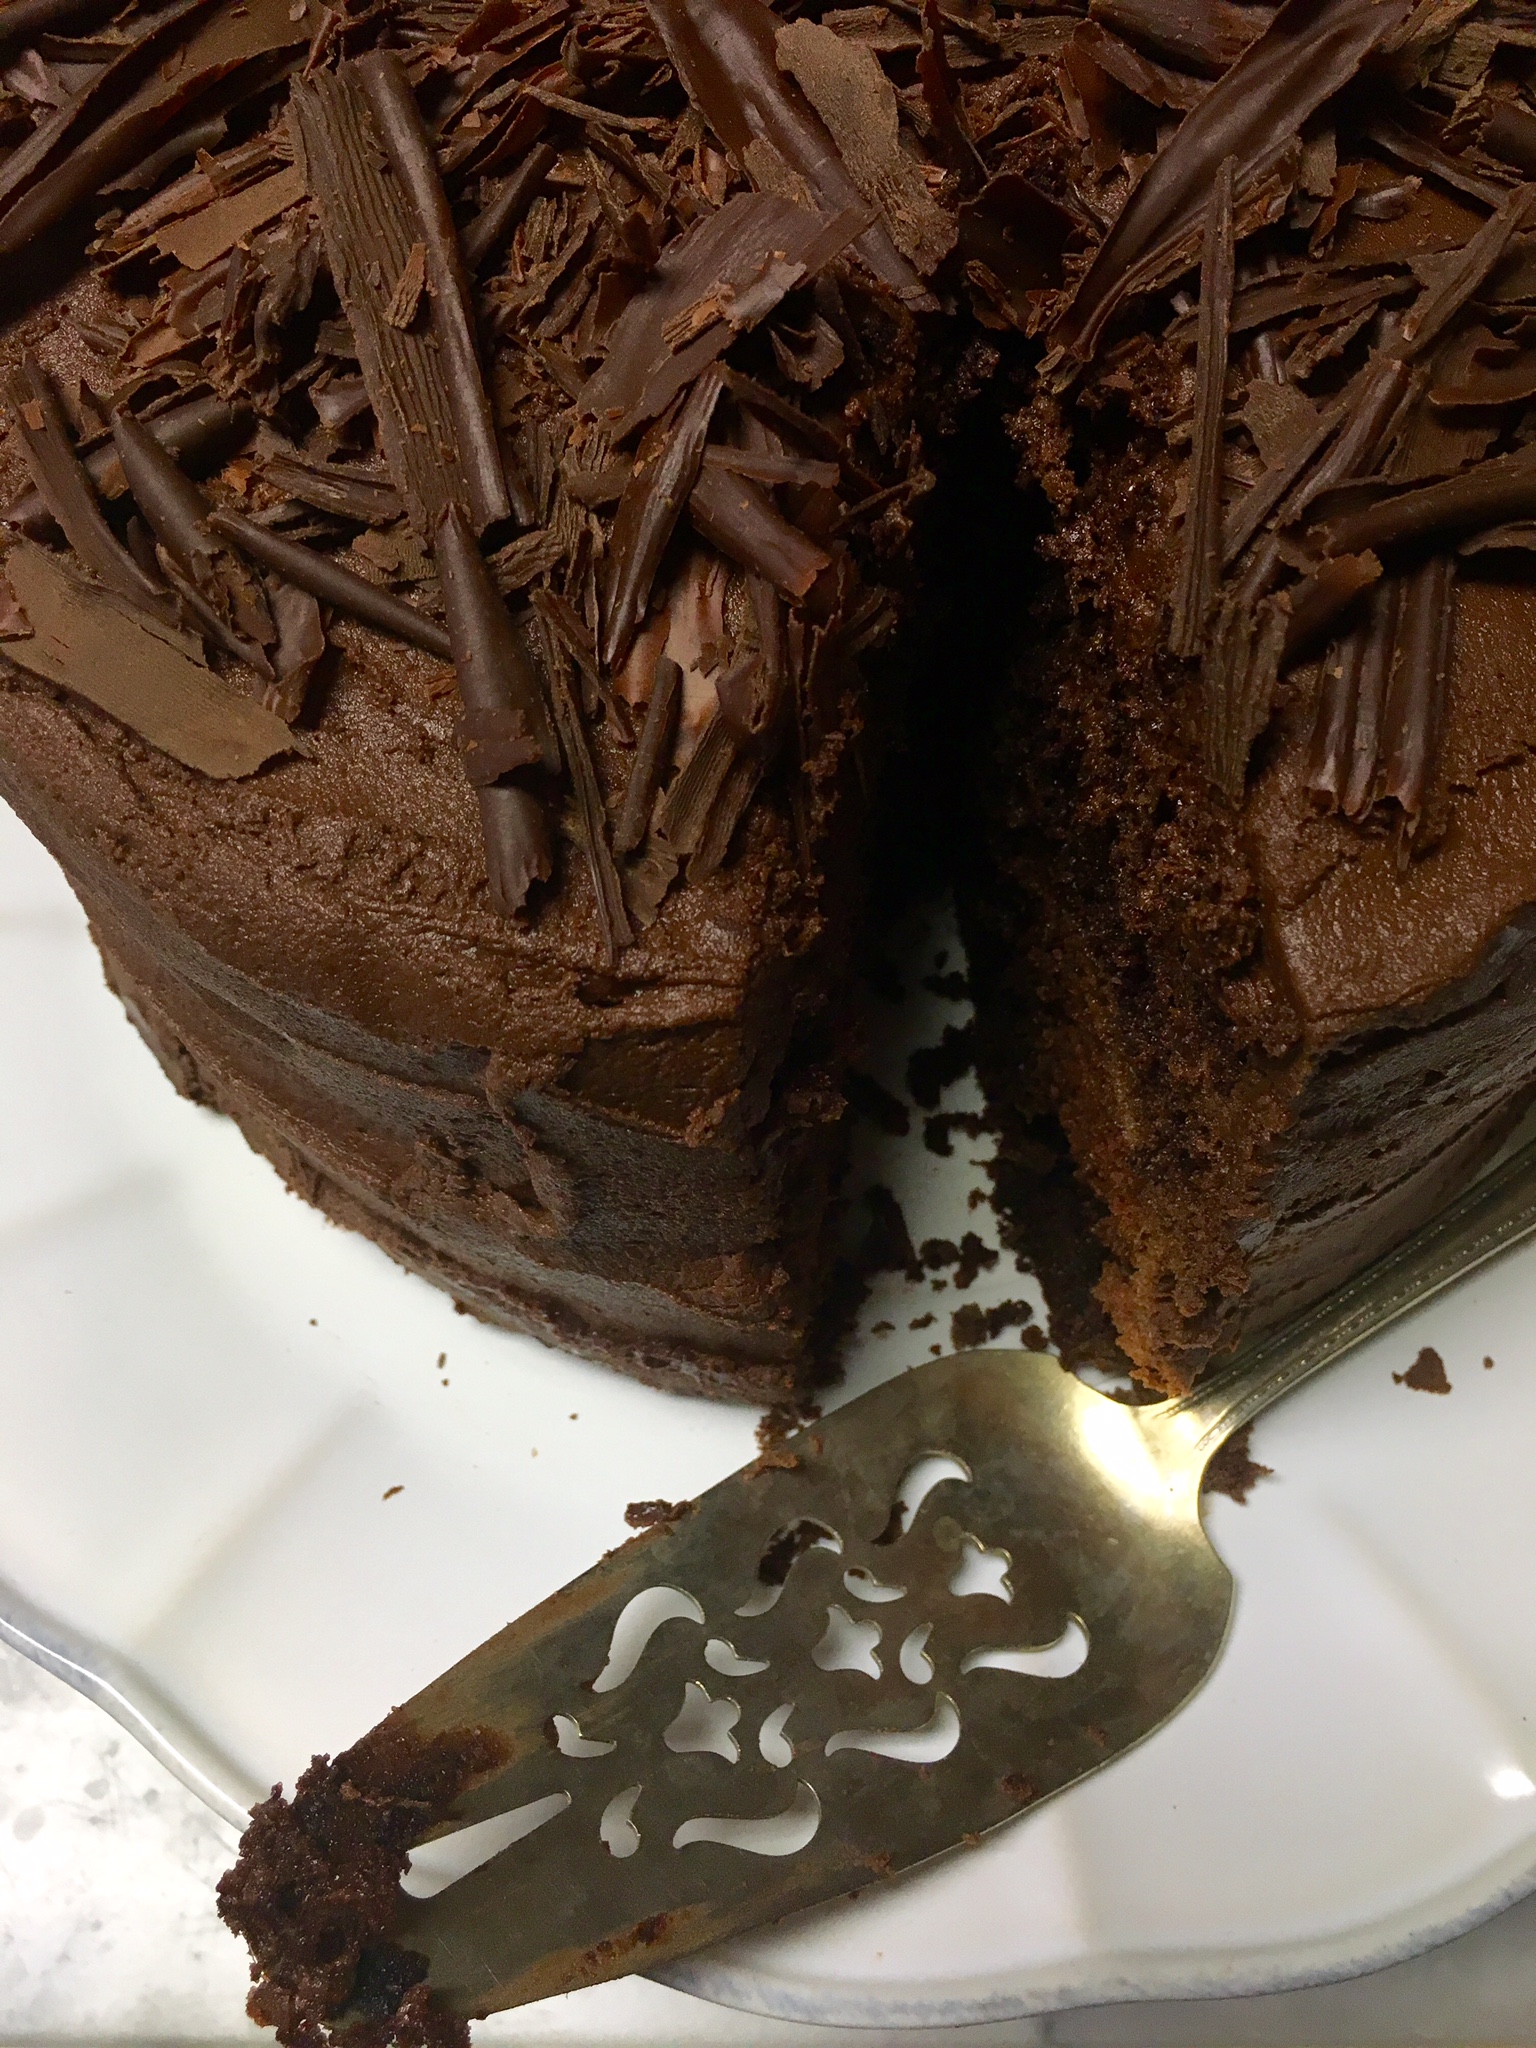
Add the butter, 1 tablespoon at a time, while beating on medium speed. Scrape down the bowl, add the melted chocolate, vanilla, and mix for 1 minute or until the chocolate is completely blended in. If the buttercream seems very soft, allow it to cool, and beat it again. If you want to make it extra special or cannot get your icing to look exactly perfect, top with chocolate curls like I did in the photo above. There are easy to make.

HOW TO MAKE CHOCOLATE CURLS

Melt some chocolate using a double boiler. Remove from the heat. Take a clean baking sheet and spread a thin layer of the chocolate onto it and place it in the freezer for 5 minutes. To make the curls, use a thin metal spatula or a clean putty knife. Press the edge of the spatula under the edge of the chocolate and push it forward... the chocolate will roll up. Place on another baking sheet lined with parchment paper and put back into the freezer to firm up. When you are ready to use, simply decorate the cake as desired... also a great garnish for ice cream!

Print Friendly and PDF

GLUTEN FREE RECIPES: CHEF JASON ROBERTS' CHOCOLATE PAVLOVA WITH DRUNKEN BERRIES

Chef Jason Roberts is a friend and colleague; we've worked together a number of times over the years and I am a big fan of his food and his devotion to living a healthy lifestyle, not to mention the impressive work he does for No Kid Hungry.  You may have seen him on The Chew, The Rachael Ray Show, Food Network or Cooking Channel. Since I've had a few requests for gluten-free recipes, I felt it best to go to an expert. Jason lives gluten-free and his most recent cookbook is a tribute to that. This recipe is a Jason shared with me that I now make it whenever I need a light, yet elegant dessert.

JASON ROBERTS' CHOCOLATE PAVLOVA WITH FRESH CREAM AND DRUNKEN BERRIES

Both Australia and New Zealand claim the Pavlova as a national dish, and stories abound as to the history of its creation. Both countries do agree, however, that the dish was named after the famous Russian ballerina Anna Pavlova. Essentially, this dessert is a baked meringue that’s topped with fresh cream and fruit. I have kept this iconic dessert simple with the addition of chocolate and Berries. When it comes to decoration, however, look to seasonal fruit such as kiwifruit, Pomegranate, and passion fruit.

Makes 12 small portions. Note: The photo above was from an event- the Pavlovas were crumbled and served it in a glass for an elegant look.

INGREDIENTS

4 egg whites

1⁄4 teaspoon cream of tartar

Pinch of salt

1⁄2 teaspoon white vinegar

1 cup granulated sugar

1 teaspoon cornstarch

1 tablespoon confectioners’ sugar

3 drops vanilla extract

2 heaping tablespoons dark cocoa powder

1 cup freshly whipped cream

DIRECTIONS:

Preheat the oven to 250°F (120°C). Line a baking sheet with aluminum foil or parchment paper.

Using an electric mixer or hand mixer on medium speed, beat the egg whites with cream of tartar and salt until they become thick and foamy.

Increase the speed to high, add the vinegar, and gradually add the granulated sugar in five separate batches, beating well between each addition. Continue beating until stiff peaks have formed and the sugar has dissolved. Sift in the cornstarch and confectioners’ sugar, then thoroughly fold in the vanilla.

Remove a cup’s worth of the meringue and put it in a clean bowl. Sift the cocoa powder over the meringue, mix it in thoroughly, and then carefully fold this mixture back into the white meringue. The goal is to keep some of the marbled effect in the meringue.

Using a tablespoon, scoop up a large spoonful of the meringue, and use a clean finger on your other hand to push the meringue onto a tray lined with foil or parchment paper. Repeat, leaving a 2-inch gap between all the meringues.

Place the meringues into the oven and bake them for 1 hour. Reduce the temperature to 160°F (70°C) and cook them for another 30–60 minutes or until they’re dry to the touch. Turn off the oven, leaving the meringues in the oven for at least another hour or even overnight.

To store the meringues, place them into an airtight container; they will stay perfectly fresh for 2–3 days.

To serve, place the meringues on a plate and top them with fresh whipped cream and a scattering of the drunken berries.

DRUNKEN BERRIES 

INGREDIENTS 

½ cup fresh raspberries

½ cup fresh blackberries

1 cup hulled and halved strawberries

½ cup Limoncello or lemon liqueur

¼ cup granulated sugar

DIRECTIONS:

Place the berries along with the sugar and alcohol into a bowl and toss lightly, allow to sit for ½ an hour before serving.

Print Friendly and PDF

For more gluten-free recipes from Jason, go to his website or order his cookbook, Good Food Fast.

SUMMER'S BEST RECIPES: FRESH PEACH PIE

Let's just call this one summer. To me, nothing says summer like fresh peaches and blueberries. Probably because we grow our own blueberries and the world's very best, juiciest, sweetest, and most delicious peaches come from Chilton County, Alabama, just minutes away. Growing up, peaches were a huge part of summer because I'd help my mom pick, peel, and slice tons of peaches to put up. I can remember picking them from the tree in the backyard; they would be warm from the sun and the fuzz would make your skin itch... so I'd wash them under the freezing cold water from the hosepipe (Alabama-speak for water hose) before we ate them.

Here's a super fast recipe for pie crust you can use for a single or double crust pie. I just prefer the rustic simplicity of this method to using a pie pan. You can whatever fruit you like but this time of year, I'm making peach. Add fresh blackberries or blueberries to this if you like; just toss them in with the peaches or sprinkle some on top if they are really ripe and sweet.

RUSTIC PEACH PIE

Prep Time: 20 minutes plus 1 hour chill time for the dough

Cook Time: 20-25 minutes

INGREDIENTS

Pastry

1 cup all-purpose flour, plus 2 tablespoons to roll out the dough

2 tablespoons granulated or superfine sugar plus ½ tablespoon to sprinkle on crust

1/4 teaspoon kosher salt

1/4 pound (1 stick) very cold unsalted butter, diced

3-4 tablespoons ice water, maybe a slight bit more depending on how dough comes together

Filling

11/2 pounds fresh peaches (6 large peaches; not too ripe work best)

1/4 teaspoon grated lemon zest

1 ½ teaspoons fresh lemon juice

1/4 cup flour

2-3 tablespoons granulated sugar (I like mine less sweet; add more if you like or need to based on how sweet your fruit is)

1/4 teaspoon kosher salt

1/4 teaspoon ground cinnamon

1/4 teaspoon nutmeg

1/8 teaspoon ground allspice

2 tablespoons cold unsalted butter, diced into small pieces

Egg Wash (optional)

1 egg, beaten

1 tablespoon cold water

Glaze (optional)

½ cup Orange Marmalade, Apricot Preserves, or Apple Jelly

Directions:

Preheat the oven to 425 degrees F. Line a baking sheet with parchment paper. Stretch a 12 x 12 piece of plastic wrap out on the counter and dust with a little of the flour, about 1 tablespoon.

For the pastry, place the flour, sugar, and salt in the bowl of a food processor fitted with a steel blade. Pulse a few times to combine the dry ingredients. Add the butter, a little at a time, pulsing between additions until the butter is the size of peas. With the motor running, add the ice water all at once through the feed tube-stop the machine just before the dough becomes a solid mass. Turn the dough onto the well-floured plastic wrap. Handle as little as possible. Fold over the plastic and form into a round. Don’t over handle or over mix because your dough will be tough. Refrigerate for at least 1 hour. When you are ready to make the pie, flour a rolling pin and put a little flour around the plastic and on both sides of the dough; roll the pastry into an 11-inch circle on the plastic wrap. Wrap it over the rolling pin and transfer it to a baking sheet. Remove the plastic wrap.

For the filling, peel, and slice the peaches, working around the pit. I will sometimes drop the peaches in boiling water for 10 seconds and then simply use a paper towel to drain and then slide the skin off the peach. You can use an ice bath if you want to stop the cooking process but since I'm going to cook them anyway, I don't bother.

I like the look of slices- I usually slice a medium peach into 10 slices. Put the peach slices into a bowl and toss with the lemon juice and the lemon zest. Next, add the flour, sugar, salt, cinnamon, nutmeg, and allspice. Add the cold butter. Mix all of the ingredients together until the peaches are well coated. Turn the peaches out onto the crust, leaving a 2-inch border all the way around.  Gently fold the border over the peaches to enclose the dough, pleating it to make a circle. Finish with the egg wash and sprinkle with granulated sugar before baking.

Bake the pie for 20-22 minutes, until the crust is browned and the peaches are tender. (Note: If you are not using the glaze, bake for another 4-5 minutes or until golden brown)

For the glaze: Microwave the preserves in a heatproof container for 10 seconds. Remove the pie from the oven. Using a pastry brush, lightly brush the crust and the filling with the melted preserves. Return to the oven for 4-5 minutes or until the pie is golden brown.

Allow to cool slightly before cutting.

Print Friendly and PDF