It really doesn't get much more Southern than Banana Pudding. You will rarely go to any event or party and not see Banana Pudding on the menu. While it is wildly popular, Banana Pudding just doesn’t look beautiful once you remove the first spoonful. I was asked to serve Banana Pudding for a charity event in Chicago but I wanted it to look elegant for this elegant occasion. I wasn't sure what to do but I had some pate a choux (dough) left over from some cream puffs hanging out in the fridge and it hits me! Put the insides of the banana pudding into puff shell! This dough makes the best little puffs and they are hollow. Perfect for filling. The experiment was a total success. Best of all, these tasted just like the banana pudding my mother used to make! BLISS!
One bite banana pudding is so pretty and easy to serve- it has been a huge hit with everyone who has tried them!
ONE BITE BANANA PUDDING
I have 3 components to this recipe: the pate a choux, the pastry cream filling and the meringue top. I have it broken down into segments below. You don’t even have to do it all at one time. I made the choux the day before serving. I made the pastry cream the following morning and I made the meringue just before I wanted to put them in the oven. The meringue will not hold so plan on using it as soon as you whip it up. Hope you love these!
*CHEF’S NOTE: For assembly, you will need 1-2 ripe bananas
CREAM PUFF DOUGH RECIPE (Pate a Choux)
Makes about 22-28 small puffs depending on how large you pipe them out
Prep: 10 minutes Bake: 20 minutes
Supplies: Cookie sheet, parchment paper, piping bags or ziptop bags (don’t use a cheap one- it will break)
This is a classic Pate a Choux dough. I always mix mine by hand because I don’t want to wash the extra bowl of the mixer but some believe (Alton Brown and Jacques Pepin for example) that you have to use a mixer to incorporate the eggs. I did a blind taste test and I cannot tell the difference in taste nor in texture or appearance.
1 cup water
1 stick unsalted butter
1/2 teaspoon sugar
1/8 teaspoon salt
1 cup all purpose flour
4 eggs
Line a baking sheet with parchment paper. Get out a large measuring cup or short glass (I find a pint mason jar works great) and put the zip top bag into it, open the top of the bag. This will give you some stability as you spoon the dough into the bag.
Preheat oven to 425 degrees F.
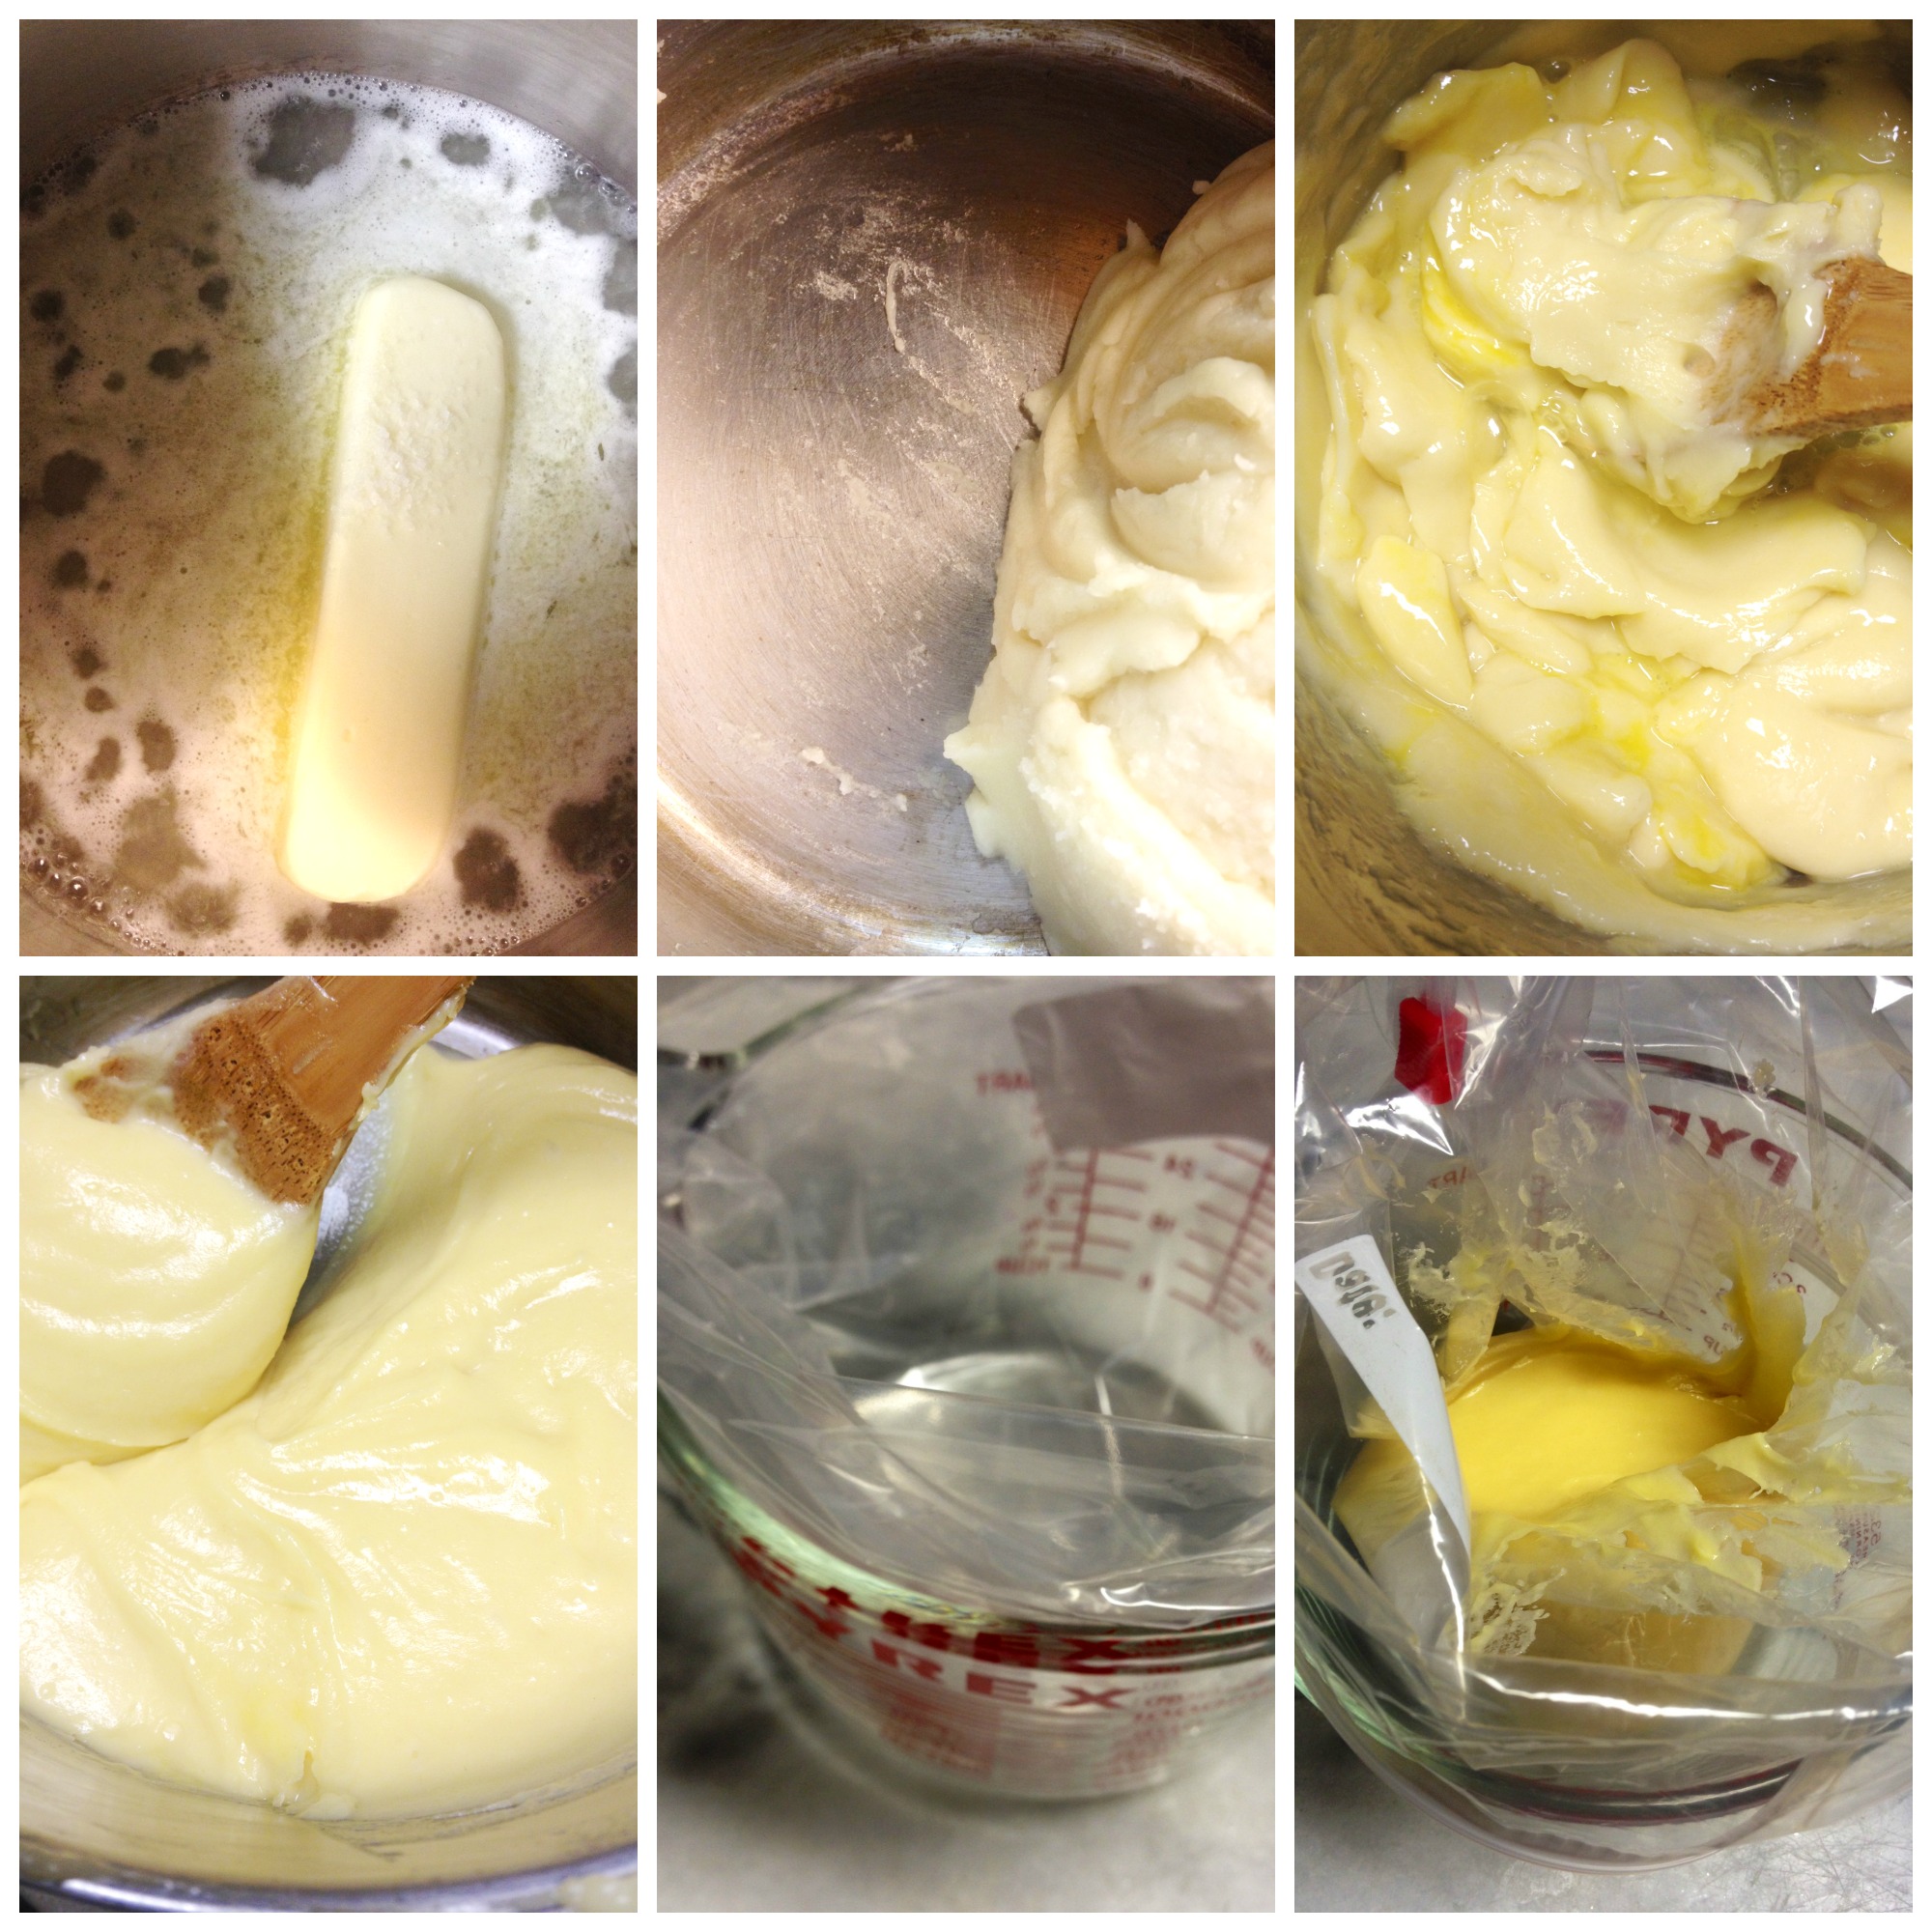
Put the water, butter, salt and sugar in a large saucepan and bring to a boil. Boil until the butter is just melted. Reduce the heat to very low. Add the flour all at one time, mixing with a wooden spoon. Cook over low heat until you start to see a little “film” on the bottom of the pan- only about 1 minute or even less. The dough will come together in a ball. Remove from the heat and allow to cool just a little bit but not too much; the dough has to be warm to accept the eggs. If the dough is too hot, you cook the eggs. This is not good.
If you are using a mixer, this is the time to transfer the dough to the bowl of your mixer. I use the same saucepan and put it on top of a dish towel to keep it from slipping around as I beat in the eggs. It is essential to add the eggs one at a time to your dough. I usually put all 4 eggs in a small bowl and just slip them in, one at a time, beating each with a wooden spoon until it is incorporated then I add the next egg and repeat. At first, it will seem as if you’ve made a mistake but do not stop. In a few seconds, the dough will go from slippery to a bit sticky as the egg is accepted into the dough. Do this 4 times. Take care not to be too aggressive with the wooden spoon because I have actually tossed an egg out onto the floor… that is how slippery the dough is in the beginning.
Once you have the eggs fully incorporated, spoon the dough into the pastry bag or zip top bag you have set up. You can use it right away or it will hold beautifully in the fridge until you are ready to use it. I have waited a day or more, in fact, but let the dough sit out at least 20 minutes before you try to pipe it onto the baking sheet or you may blow out the side of the zip top bag. Again, not good.
Pipe the dough into heart shaped or little puffs (see photo at the top) For the heart, draw the outside and then fill in the middle. For the puffs, I find that swirls don’t cook as pretty as simply applying pressure to the bag until the puff is the size I want, then pull the bag back. It forms a little tip when you do this so before you put the into the oven, wet your finger with water and push down any little peaks so they don’t burn.
Bake the puffs for 10-12 minutes at 425 degrees. Open the door and quickly rotate the pan and reduce the heat to 350 degrees for 10-12 more minutes. It is important not to simply switch the pan to an oven set to 350. The puffs will deflate.
I’ve had to trial and error this timing with my oven… and to my taste. I don’t want dried out puffs but I also don’t want them too wet or eggy. Grab one out, let it cool slightly and check the inside to see if it is what you want. If so, remove them from the oven. If not, give them a minute more.
Take a small paring knife or even a toothpick and puncture the top of the puff so the steam can escape. Allow them to cool on a rack before filling.
Put the water, butter, and salt in a pot, bring to boil. Add the flour all at once off the heat but put it back on the heat and cook for a minute or two until a slight film starts to form on the bottom of the pan. Remove from the heat. Add the eggs, stirring them in one at a time until each one is fully incorporated before adding the next. Spoon into a ziptop bag; I like to put it over a large bowl or measuring cup to make it easier.
Spoon the Pate a Choux into a piping bag or ziptop bag. Snip the end. Pipe onto baking sheet lined with parchment. Use some water on your finger to push down the peak before baking. Let them cool on a rack. Pierce the puff with a knife to allow the steam to escape.
PASTRY CREAM
For my banana pudding, I did not use a vanilla bean like I normally would because I didn’t want the bean flecks in the custard.
Makes 2 1/2 cups
Prep: 5 minutes Cook: 12 minutes Chill: 10 minutes
Supplies: Large bowl filled 1/2 full with ice and water
1 cup heavy cream
1 cup milk plus 3 ounces more (a little more than 1)/2 cup)
2 teaspoons pure vanilla extract plus a tiny drop each of almond and lemon extract
8 egg yolks in a medium heat-proof bowl
1/2 cup granulated sugar
6 tablespoons cornstarch
1/4 stick unsalted butter
Make an ice bath in a heat proof bowl by filling it 1/2 full with ice and water.
Put 1 cup of milk and the cream in a large saucepan. Bring to a simmer. (you will see the little bubbles foaming around the edges of the pot)
Remove from the heat.
Add the sugar to the yolks and whisk for 30 seconds to help dissolve the sugar.
Put the saucepan back onto medium heat and bring it back to a simmer. Once you reach the simmer, temper the eggs by briskly whisking a small amount of the hot mixture into the eggs; keep whisking constantly; adding a little more of the hot mixture into the eggs. Continue whisking it in until you have it all incorporated and then return to the saucepan.
Next, use a fork to whisk/dissolve the cornstarch into the remaining 3 ounces of milk. I just use the measuring cup because it shows the ounces on the outside. It is just under 1/2 cup of milk.
Put the saucepan back over medium heat. Whisk in the cornstarch mixture. Continue whisking or stirring over medium heat. As you are stirring, suddenly, you will notice it beginning to thicken up. Don’t think you have ruined it or curdled it. Just keep stirring until it just comes to a boil and is thick. Remove from the heat.
Put the saucepan into the ice bath you prepared earlier; take care not to allow any water to get into the pan and continue stirring to cool the custard a bit. Add the vanilla, almond and lemon extracts plus the butter and stir until it is completely melted and incorporated. Transfer to a bowl and cover the surface with plastic wrap or spoon into a piping bag. Refrigerate until ready to use.
ASSEMBLY
1. Slice the tips off of the puffs. Eat or save for later.
2. Pipe a dollop of pastry cream into the puff.
3. Slice a banana and add one slice on top of the pastry cream.
4. Pipe more pastry cream into each puff, filling it completely.
5. Make the meringue (see recipe below) and top each puff.
6. Bake until the meringue is golden brown.
7. Eat 3-4 as soon as they come out of the oven while warm.
MAKE THE MERINGUE TOPPING
I learned how to make meringue from my mom and I love the way hers was always so light and fluffy. However, my sweet and uber talented pastry chef friend, Geri-Martha taught me to first whisk the egg whites and the sugar together over a double boiler to dissolve the sugar so there is no grit remaining. For the photo above, I did not use the double boiler method, but for the party, I will. I like the texture better if you bother to do the double boiler step. Also, many people use cream of tartar or vinegar in their meringue. I don’t because I personally think it creates more “shrinkage” where the meringue pulls away from the crust.
FYI: The ratio for meringue is 4:1. An egg white is about 1 ounce. Therefore you would use about 1 cup of sugar for every 4 egg whites.
CLASSIC MERINGUE RECIPE
4 egg whites
1 cup granulated sugar
Preheat the oven to 425. Line a baking sheet with parchment paper.
Put the egg whites and the sugar in your mixing bowl (make sure it is heatproof or use a heatproof bowl) over a double boiler that is simmering. Do not let the water touch the bowl and make sure the heat is not a full boil but a simmer.
Rapidly whisk the whites and sugar together until there is no grit remaining. This happens faster than you might think.
Remove from heat. Dry off the bottom and sides of the bowl. Put it on your mixer stand with the whisk attachment. (if you do not have one, you can just use your hand-held mixer) Start at low speed for 30 seconds then increase the speed to medium high and beat until shiny and stiff peaks form when you lift the whisk from the bowl.
Immediately spoon the whites into a piping bag or zip top bag. They will not hold long. Snip the tip of the bag and pipe onto your prepared shell taking care to ”seal” the edges with the meringue.
Bake at 425 for 4 minutes or until golden brown.


