RECIPE: CLASSIC MINT JULEPS FOR YOUR DERBY DAY PARTY!

Whether you are headed to the Derby or just watching the best two minutes in sports on your television, be sure to have my Mint Julep recipe on the menu!

I am a horse fanatic, I have been since I was a kid. So much so, I'd fall asleep with my entire plastic horse collection in my bed. I get excited about the Derby even though I don't follow horse racing. I've only been once but it was quite the experience... no other sporting event can compare. The hats, the pretty women, the dashing guys, the Southern charm, the majesty of the horses, and of course, the Kentucky bourbon and the Mint Juleps! I always crack up because the Mint Julep is THE drink associated with the South more than any other. When I meet people from other countries and they find out I'm from Alabama, they tell me their impression is that we all sit around on the porch, sipping Mint Juleps..... So in tribute to the horses and most magnificent race in sports, here's a classic Mint Julep recipe my way, just in time for Derby Day. 

MARTIE'S MINT JULEP RECIPE

A silver or pewter Mint Julep cup does make this cocktail more authentic and yes, even more delicious.

A silver or pewter Mint Julep cup does make this cocktail more authentic and yes, even more delicious.

To begin, make a simple syrup infused with mint. This will really bring a wonderful mint flavor to the cocktail and you can also use it to sweeten tea. For the simple syrup, combine equal parts sugar and water. For 6 drinks, I am using 1 cup each sugar and water. Bring it to a boil, and turn off the heat, stirring until the sugar dissolves. Add 15-20 fresh mint leaves. Stir. Allow the syrup to cool completely. Strain and pour into a canning jar, secure the lid, and chill. This will keep in the refrigerator for a week.

For one cocktail:

3 fresh mint leaves (plus more for garnish)

3 tablespoons mint syrup (depending on how sweet you like it, I like 3)

1  1/2 ounces Kentucky bourbon (I like Four Roses bourbon)

Crushed ice

Powdered sugar for garnish, if desired

Chill your glasses prior to serving. A traditional silver mint julep cup makes this cocktail so frosty and delicious. Add the syrup and mint leaves to a pitcher or shaker. Use a wooden spoon to muddle (not tear) the mint into the syrup to release the oil. Add the bourbon. Fill the cup with crushed ice and strain the bourbon over the ice, almost like a snow cone. Add a straw, a mint sprig, and a dusting of powdered sugar over the top, if you like. Serve immediately.

For a lighter, less potent version, add 1/2 cup of unsweetened tea to fill the cup after you add the bourbon.

SALAD IN A JAR: LAYERED SPINACH AND STRAWBERRY SALAD WITH POPPYSEED DRESSING

This is one of my all-time favorite party recipes...  Serving guests a salad in a Jar is so easy, so versatile and it can be used for so many different occasions. In fact, it is also perfect for lunch on the go or for the kids. Layer your favorite ingredients in a jar and chill. When you are ready to serve, simply shake it up. That's it!

If you are going to prep the day before your event, you probably should add the dressing just before serving so everything doesn't get soggy and just put it right on top. But you can prep up to four hours before with the dressing in the bottom and you'll be fine... but keep the jars chilled on ice, in the fridge, or in a cooler. And it is a perfect solution for picnics, too!

So pretty, so functional and so delicious! Layered salad in a jar makes serving and eating salad at a party so much easier! No grappling with tongs or trying to balance everything to add dressing.

So pretty, so functional and so delicious! Layered salad in a jar makes serving and eating salad at a party so much easier! No grappling with tongs or trying to balance everything to add dressing.

LAYERED SPINACH AND STRAWBERRY SALAD IN A JAR WITH HOMEMADE POPPYSEED DRESSING

Makes 6

INGREDIENTS

1- 9 ounce package of fresh baby spinach leaves, wash and remove the stems

1- 16 ounce container fresh strawberries, washed, dried, hulled, and sliced

1- 15 ounce can Mandarin orange slices, drained

2 cups walnuts, toasted and roughly chopped

1- 6 ounce container Belle Chevre Belle and the Bee Breakfast goat cheese (or if you cannot find it, make your own by swirling honey into goat cheese to make it creamy and slightly sweet)

Poppyseed Dressing recipe  (or your favorite dressing

DIRECTIONS:

Start by spooning about 2-3 tablespoons of dressing into the bottom of the jar. Use enough so you can see the layer of dressing. Next, add about 1 1/2 cups of the spinach leaves. Layer the strawberry slices around the outside of the jar and work your way in so they look pretty. Do the same with the orange slices. Next, add the walnuts and top with a thin layer of the goat cheese. You want to be able to see each layer- the colorful layers is what is so pretty about this salad. Secure the lid and chill until serving time.


HOMEMADE POPPYSEED DRESSING

One of my summer favorites, this is also a delicious dip or dressing for fresh fruit.

INGREDIENTS

1 1/2 tablespoons apple cider vinegar

1/2 teaspoon dry mustard

1/2 teaspoon honey

1/4 teaspoon lemon juice

1/8 teaspoon Kosher salt

1/4 teaspoon sugar

1/8 cup sweet white onion, like a Vidalia, chopped

1/2 cup plain yogurt (some people prefer mayo instead)

2 1/2 tablespoons vegetable oil

3/4 teaspoon poppyseeds

a bit of water to thin, if desired

DIRECTIONS:

Add everything but the oil and the poppyseeds into a blender or food processor and blend until very smooth and there is no trace of the onion. Reduce to the lowest speed and stream in the vegetable oil. Turn off the blender and add the poppyseeds. If you find it too thick (which I love for fruit) you can thin with a bit of water for salad dressing.  I use an immersion blender for this recipe. It's fast and easy to clean up.

Print Friendly and PDF

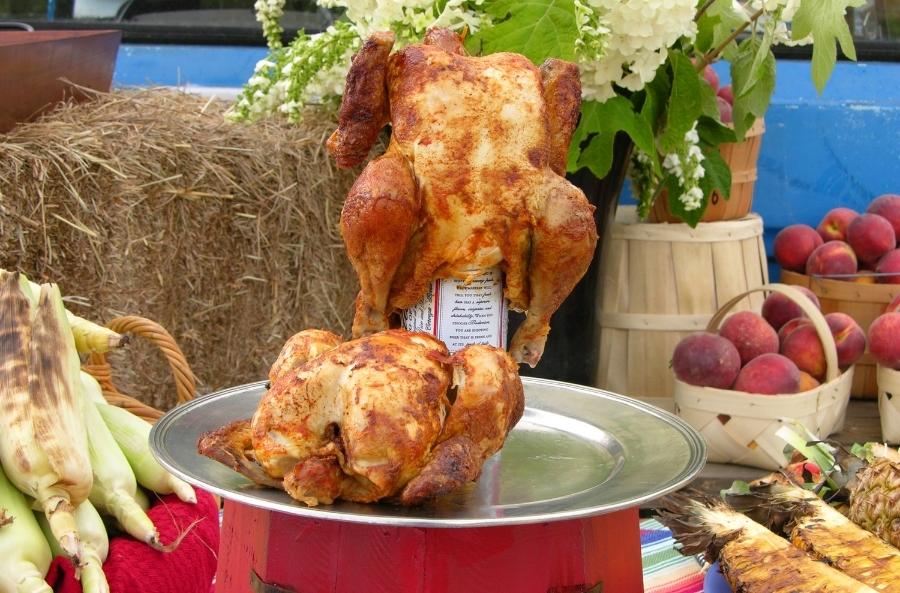
RECIPE: MARTIE'S BEER CAN CHICKEN

Planning a get-together to kick off grilling season? My Beer Can Chicken is juicy, tender and full of smoky flavor. The bird stays super moist from the steam created from sitting perched atop an open beer can. You want the bird to sit squarely on the can so smaller birds, about 3 pounds,  tend to work best. I use the actual beer cans for grilling my chickens but you can use a vertical chicken roaster that is far more stable than trying to keep the birds balanced on a can. If you don't want to use beer--you can use a can of lemonade---the carbonated fizzy kind of lemonade works best and the Shandy or Arnold Palmer varieties work well also. The recipe starts with the rub; make mine or use your own favorite rub. This BBQ rub recipe is great on ribs, too.

MARTIE'S BEER CAN CHICKEN

INGREDIENTS

1 whole chicken (3-4 pounds)

1 large can beer per chicken

1 tablespoon vegetable oil per chicken

2 tablespoons unslated butter, room temperature

BBQ RUB:

2 tablespoons brown sugar

1/4 cup paprika

2 teaspoon cayenne pepper

1 teaspoon granulated sugar

2 teaspoon kosher salt

1 1/2 teaspoon dry mustard

1 teaspoon black pepper

1 teaspoon garlic powder

1 teaspoon onion powder

1 teaspoon celery salt

1/4 teaspoon chipotle pepper

Mix all ingredients together in a bowl or zip top bag.

DIRECTIONS:

Mix all rub ingredients together in a bowl or zip top bag. Will keep in a cool place for up to two months.

Add 1/2 tablespoon of rub to the butter and mix together well.

For the chicken: Trim excess skin or fat from each bird. Remove and do whatever the heck you want with any "giblets" or packages you get with a whole bird. Wash and rinse the chicken under cold water and pat dry. A

Rub the bird with one tablespoon vegetable oil. This helps the skin crisp and holds the rub.

Spoon a tablespoon of the rub mixture into the cavity of the bird and rub it in well. Gently separate the skin from the flesh and rub the butter mixture onto the bird without tearing the skin. Rub another tablespoon of the rub mixture onto the skin of the bird. Do not cover but refrigerate for at least two hours and up to 24 hours before grilling.  Remove the chicken from the fridge one hour before grilling to take the chill off.

LOW & SLOW GRILLING ON INDIRECT HEAT

Light the grill. Once the coals are medium heat, push them around the edges of the grill leaving the center open. I always put a grill pan in the middle. Since we're cooking LOW & SLOW, you may need to have extra coals available if you are using charcoal. I keep mine in a chimney style charcoal starter. If you are using gas, it is easy to keep the temperature consistent. Keep a mister or water bottle on hand to shoot down any hot spots that flare up.

Open the beer and pour out about 1 cup. Add 2 tablespoons lemon juice to it and put in a mister to occasionally mist the bird while cooking, if you like.

Push the chicken down onto the beer can and place on the grill. Push the bird down onto the can so the legs help prop it up sort of like a camera tripod. I use a leave-in digital meat thermometer when I cook any kind of meat but especially chicken. That is the best way to get a perfect bird. Follow the directions for the type of thermometer you have. 

Close the lid and try to resist peaking but you will want to monitor the heat and the temperature carefully in case of flare-ups because there is sugar in the rub which can cause it to burn if you have the heat too high. Don't rush the process. The birds will take about 1 1/2 -2 hours to cook depending on size and heat. 

The perfect internal temperature for chicken is 165 degrees. I cook mine to 160 degrees then remove it from the heat and allow it to rest, uncovered,  for at least 15 minutes before carving. It will "carry over cook" up to 165 degrees  during the resting time. 

Serve with my Chimichurri- it is  soooo good! Get the recipe...

TIP: Be food safe when cooking and grilling outdoors! Go to the USDA's "Ask Karen" website for more information on recommended safe cooking temperatures for meat and poultry and learn more about grilling from BBQ Pitmaster and Memphis in May champion Chris Lilly. Read more...

Print Friendly and PDF