SALAD IN A JAR: LAYERED SPINACH AND STRAWBERRY SALAD WITH POPPYSEED DRESSING

This is one of my all-time favorite party recipes...  Serving guests a salad in a Jar is so easy, so versatile and it can be used for so many different occasions. In fact, it is also perfect for lunch on the go or for the kids. Layer your favorite ingredients in a jar and chill. When you are ready to serve, simply shake it up. That's it!

If you are going to prep the day before your event, you probably should add the dressing just before serving so everything doesn't get soggy and just put it right on top. But you can prep up to four hours before with the dressing in the bottom and you'll be fine... but keep the jars chilled on ice, in the fridge, or in a cooler. And it is a perfect solution for picnics, too!

So pretty, so functional and so delicious! Layered salad in a jar makes serving and eating salad at a party so much easier! No grappling with tongs or trying to balance everything to add dressing.

So pretty, so functional and so delicious! Layered salad in a jar makes serving and eating salad at a party so much easier! No grappling with tongs or trying to balance everything to add dressing.

LAYERED SPINACH AND STRAWBERRY SALAD IN A JAR WITH HOMEMADE POPPYSEED DRESSING

Makes 6

INGREDIENTS

1- 9 ounce package of fresh baby spinach leaves, wash and remove the stems

1- 16 ounce container fresh strawberries, washed, dried, hulled, and sliced

1- 15 ounce can Mandarin orange slices, drained

2 cups walnuts, toasted and roughly chopped

1- 6 ounce container Belle Chevre Belle and the Bee Breakfast goat cheese (or if you cannot find it, make your own by swirling honey into goat cheese to make it creamy and slightly sweet)

Poppyseed Dressing recipe  (or your favorite dressing

DIRECTIONS:

Start by spooning about 2-3 tablespoons of dressing into the bottom of the jar. Use enough so you can see the layer of dressing. Next, add about 1 1/2 cups of the spinach leaves. Layer the strawberry slices around the outside of the jar and work your way in so they look pretty. Do the same with the orange slices. Next, add the walnuts and top with a thin layer of the goat cheese. You want to be able to see each layer- the colorful layers is what is so pretty about this salad. Secure the lid and chill until serving time.


HOMEMADE POPPYSEED DRESSING

One of my summer favorites, this is also a delicious dip or dressing for fresh fruit.

INGREDIENTS

1 1/2 tablespoons apple cider vinegar

1/2 teaspoon dry mustard

1/2 teaspoon honey

1/4 teaspoon lemon juice

1/8 teaspoon Kosher salt

1/4 teaspoon sugar

1/8 cup sweet white onion, like a Vidalia, chopped

1/2 cup plain yogurt (some people prefer mayo instead)

2 1/2 tablespoons vegetable oil

3/4 teaspoon poppyseeds

a bit of water to thin, if desired

DIRECTIONS:

Add everything but the oil and the poppyseeds into a blender or food processor and blend until very smooth and there is no trace of the onion. Reduce to the lowest speed and stream in the vegetable oil. Turn off the blender and add the poppyseeds. If you find it too thick (which I love for fruit) you can thin with a bit of water for salad dressing.  I use an immersion blender for this recipe. It's fast and easy to clean up.

Print Friendly and PDF

RECIPE: MARTIE'S BEER CAN CHICKEN

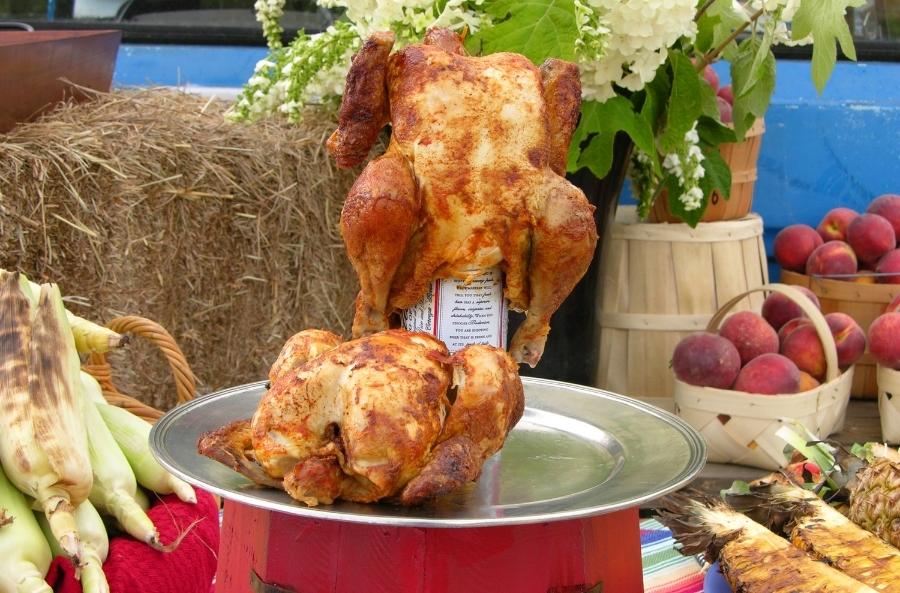
Planning a get-together to kick off grilling season? My Beer Can Chicken is juicy, tender and full of smoky flavor. The bird stays super moist from the steam created from sitting perched atop an open beer can. You want the bird to sit squarely on the can so smaller birds, about 3 pounds,  tend to work best. I use the actual beer cans for grilling my chickens but you can use a vertical chicken roaster that is far more stable than trying to keep the birds balanced on a can. If you don't want to use beer--you can use a can of lemonade---the carbonated fizzy kind of lemonade works best and the Shandy or Arnold Palmer varieties work well also. The recipe starts with the rub; make mine or use your own favorite rub. This BBQ rub recipe is great on ribs, too.

MARTIE'S BEER CAN CHICKEN

INGREDIENTS

1 whole chicken (3-4 pounds)

1 large can beer per chicken

1 tablespoon vegetable oil per chicken

2 tablespoons unslated butter, room temperature

BBQ RUB:

2 tablespoons brown sugar

1/4 cup paprika

2 teaspoon cayenne pepper

1 teaspoon granulated sugar

2 teaspoon kosher salt

1 1/2 teaspoon dry mustard

1 teaspoon black pepper

1 teaspoon garlic powder

1 teaspoon onion powder

1 teaspoon celery salt

1/4 teaspoon chipotle pepper

Mix all ingredients together in a bowl or zip top bag.

DIRECTIONS:

Mix all rub ingredients together in a bowl or zip top bag. Will keep in a cool place for up to two months.

Add 1/2 tablespoon of rub to the butter and mix together well.

For the chicken: Trim excess skin or fat from each bird. Remove and do whatever the heck you want with any "giblets" or packages you get with a whole bird. Wash and rinse the chicken under cold water and pat dry. A

Rub the bird with one tablespoon vegetable oil. This helps the skin crisp and holds the rub.

Spoon a tablespoon of the rub mixture into the cavity of the bird and rub it in well. Gently separate the skin from the flesh and rub the butter mixture onto the bird without tearing the skin. Rub another tablespoon of the rub mixture onto the skin of the bird. Do not cover but refrigerate for at least two hours and up to 24 hours before grilling.  Remove the chicken from the fridge one hour before grilling to take the chill off.

LOW & SLOW GRILLING ON INDIRECT HEAT

Light the grill. Once the coals are medium heat, push them around the edges of the grill leaving the center open. I always put a grill pan in the middle. Since we're cooking LOW & SLOW, you may need to have extra coals available if you are using charcoal. I keep mine in a chimney style charcoal starter. If you are using gas, it is easy to keep the temperature consistent. Keep a mister or water bottle on hand to shoot down any hot spots that flare up.

Open the beer and pour out about 1 cup. Add 2 tablespoons lemon juice to it and put in a mister to occasionally mist the bird while cooking, if you like.

Push the chicken down onto the beer can and place on the grill. Push the bird down onto the can so the legs help prop it up sort of like a camera tripod. I use a leave-in digital meat thermometer when I cook any kind of meat but especially chicken. That is the best way to get a perfect bird. Follow the directions for the type of thermometer you have. 

Close the lid and try to resist peaking but you will want to monitor the heat and the temperature carefully in case of flare-ups because there is sugar in the rub which can cause it to burn if you have the heat too high. Don't rush the process. The birds will take about 1 1/2 -2 hours to cook depending on size and heat. 

The perfect internal temperature for chicken is 165 degrees. I cook mine to 160 degrees then remove it from the heat and allow it to rest, uncovered,  for at least 15 minutes before carving. It will "carry over cook" up to 165 degrees  during the resting time. 

Serve with my Chimichurri- it is  soooo good! Get the recipe...

TIP: Be food safe when cooking and grilling outdoors! Go to the USDA's "Ask Karen" website for more information on recommended safe cooking temperatures for meat and poultry and learn more about grilling from BBQ Pitmaster and Memphis in May champion Chris Lilly. Read more...

Print Friendly and PDF

RECIPE: OLD FASHIONED SOUTHERN LEMON MERINGUE PIE

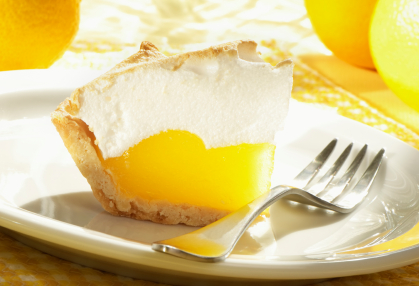
My mom was an amazing pie maker- I've said it a million times. She made a pie or cobbler almost every single day and when I'd come home to Birmingham from my travels, I always knew I could always count on there being a Lemon Meringue Pie waiting for me.  It is one of my favorite memories and certainly one of my favorite pies. Make one of these for someone special in your life and start a tradition of your own.

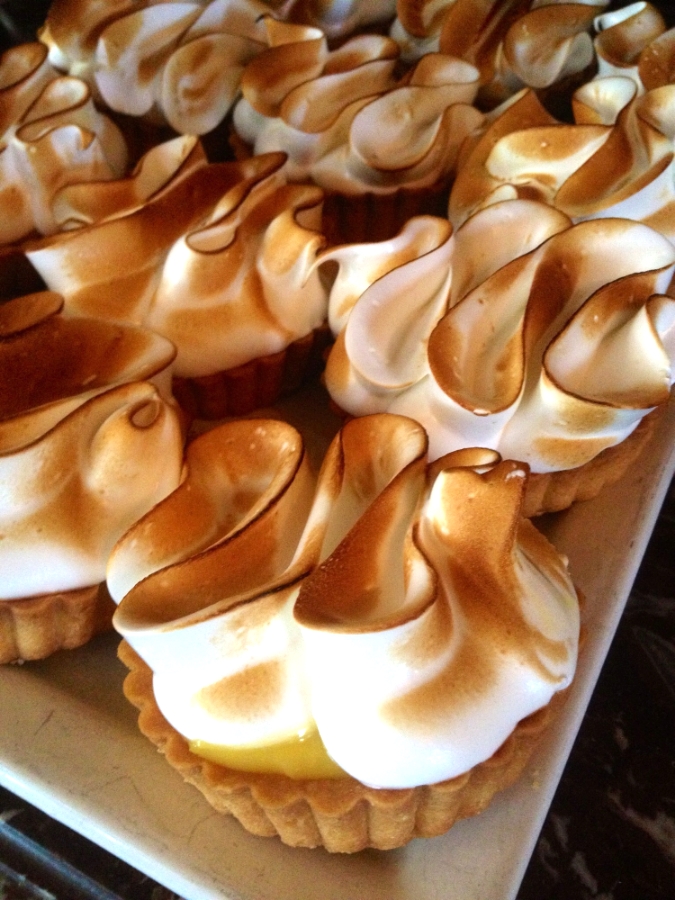
I wish I could take credit for those gorgeous swirled tarts on the right- those are from Chez Fonfon in Birmingham. I just wanted to show you that meringue can be a light to deep golden brown, depending on your taste. They make the swirls using a large pastry bag fitted with a wide, flat tip.

OLD-FASHIONED SOUTHERN LEMON MERINGUE PIE

For a 9 inch pie or 8 tarts, depending on the size of your tart pans

INGREDIENTS

1- pie crust for a 9" pie plate, pre-baked (homemade or store bought)

LEMON MERINGUE FILLING

1 cup sugar

3 tablespoons cornstarch

1/4 teaspoon salt

1 3/4 cups whole milk

4 large egg yolks, beaten well. (Save the egg whites for the meringue)

1 1/2 teaspoons finely grated lemon zest

1/3 cup freshly squeezed lemon juice

3 tablespoons butter, room temperature

MERINGUE

5 egg whites

1/4 cup plus 2 tablespoons sugar

1/2 teaspoon cream of tartar (find it in the spice aisle)

1/2 teaspoon vanilla

DIRECTIONS:

Preheat the oven to 350 degrees F.

FOR THE FILLING: Separate the egg yolks and whites. Put the yolks in a heat-proof bowl and beat them until they are slightly thickened. Add the sugar, salt, and cornstarch to a medium saucepan. Use a fork to combine the ingredients. Add the milk, 1/4 cup at a time, whisking each addition to incorporate very well. Cook over medium heat, stirring constantly, until the mixture comes to a boil. Boil exactly one minute, stirring constantly to keep it from burning. Remove from the heat. Carefully temper the egg yolks with the hot mixture by whisking 1/4 cup of the hot liquid into the eggs, stirring to incorporate. Whisk another 1/4 cup of the hot mixture to the eggs and then turn the tempered egg mixture into the saucepan.

Cook over medium heat for 3 minutes, stirring constantly. Remove from the heat. Add the lemon zest, lemon juice, and butter. Stir well to combine. Set aside. 

FOR THE MERINGUE: Put the egg whites in a very clean mixing bowl. Beat on high speed for 30 seconds until the whites are frothy. Add the cream of tartar, beating on medium high until soft peaks form. Next, add the sugar, one tablespoon at a time until all the sugar is added and stiff, shiny peaks form. This takes about 3-4 minutes. Beat in the vanilla.

ASSEMBLY: Some people butter the bottom of a baked pie shell to act as a barrier between the filling and the crust so it won't get soggy. I did not do this step but you can if you like. Pour the filling into the pre-baked crust. Spread the meringue over the pie filling. The key is to make sure to spread the meringue all the way to the edges so the meringue doesn't shrink away from the crust as it bakes.

Bake the pie at 350 degrees F. for 15 minutes or until the meringue is golden. Cool the pie on a wire baking rack until it is cool (about 1 hour) and then put it into the refrigerator to cool completely before cutting it. (I usually allow it to chill in the fridge for at least 3 hours before serving. You can chill it less time but the filling might be not be completely set.)

Print Friendly and PDF