RECIPE: DARK CHERRY CLAFOUTIS (Fluffy french dessert)

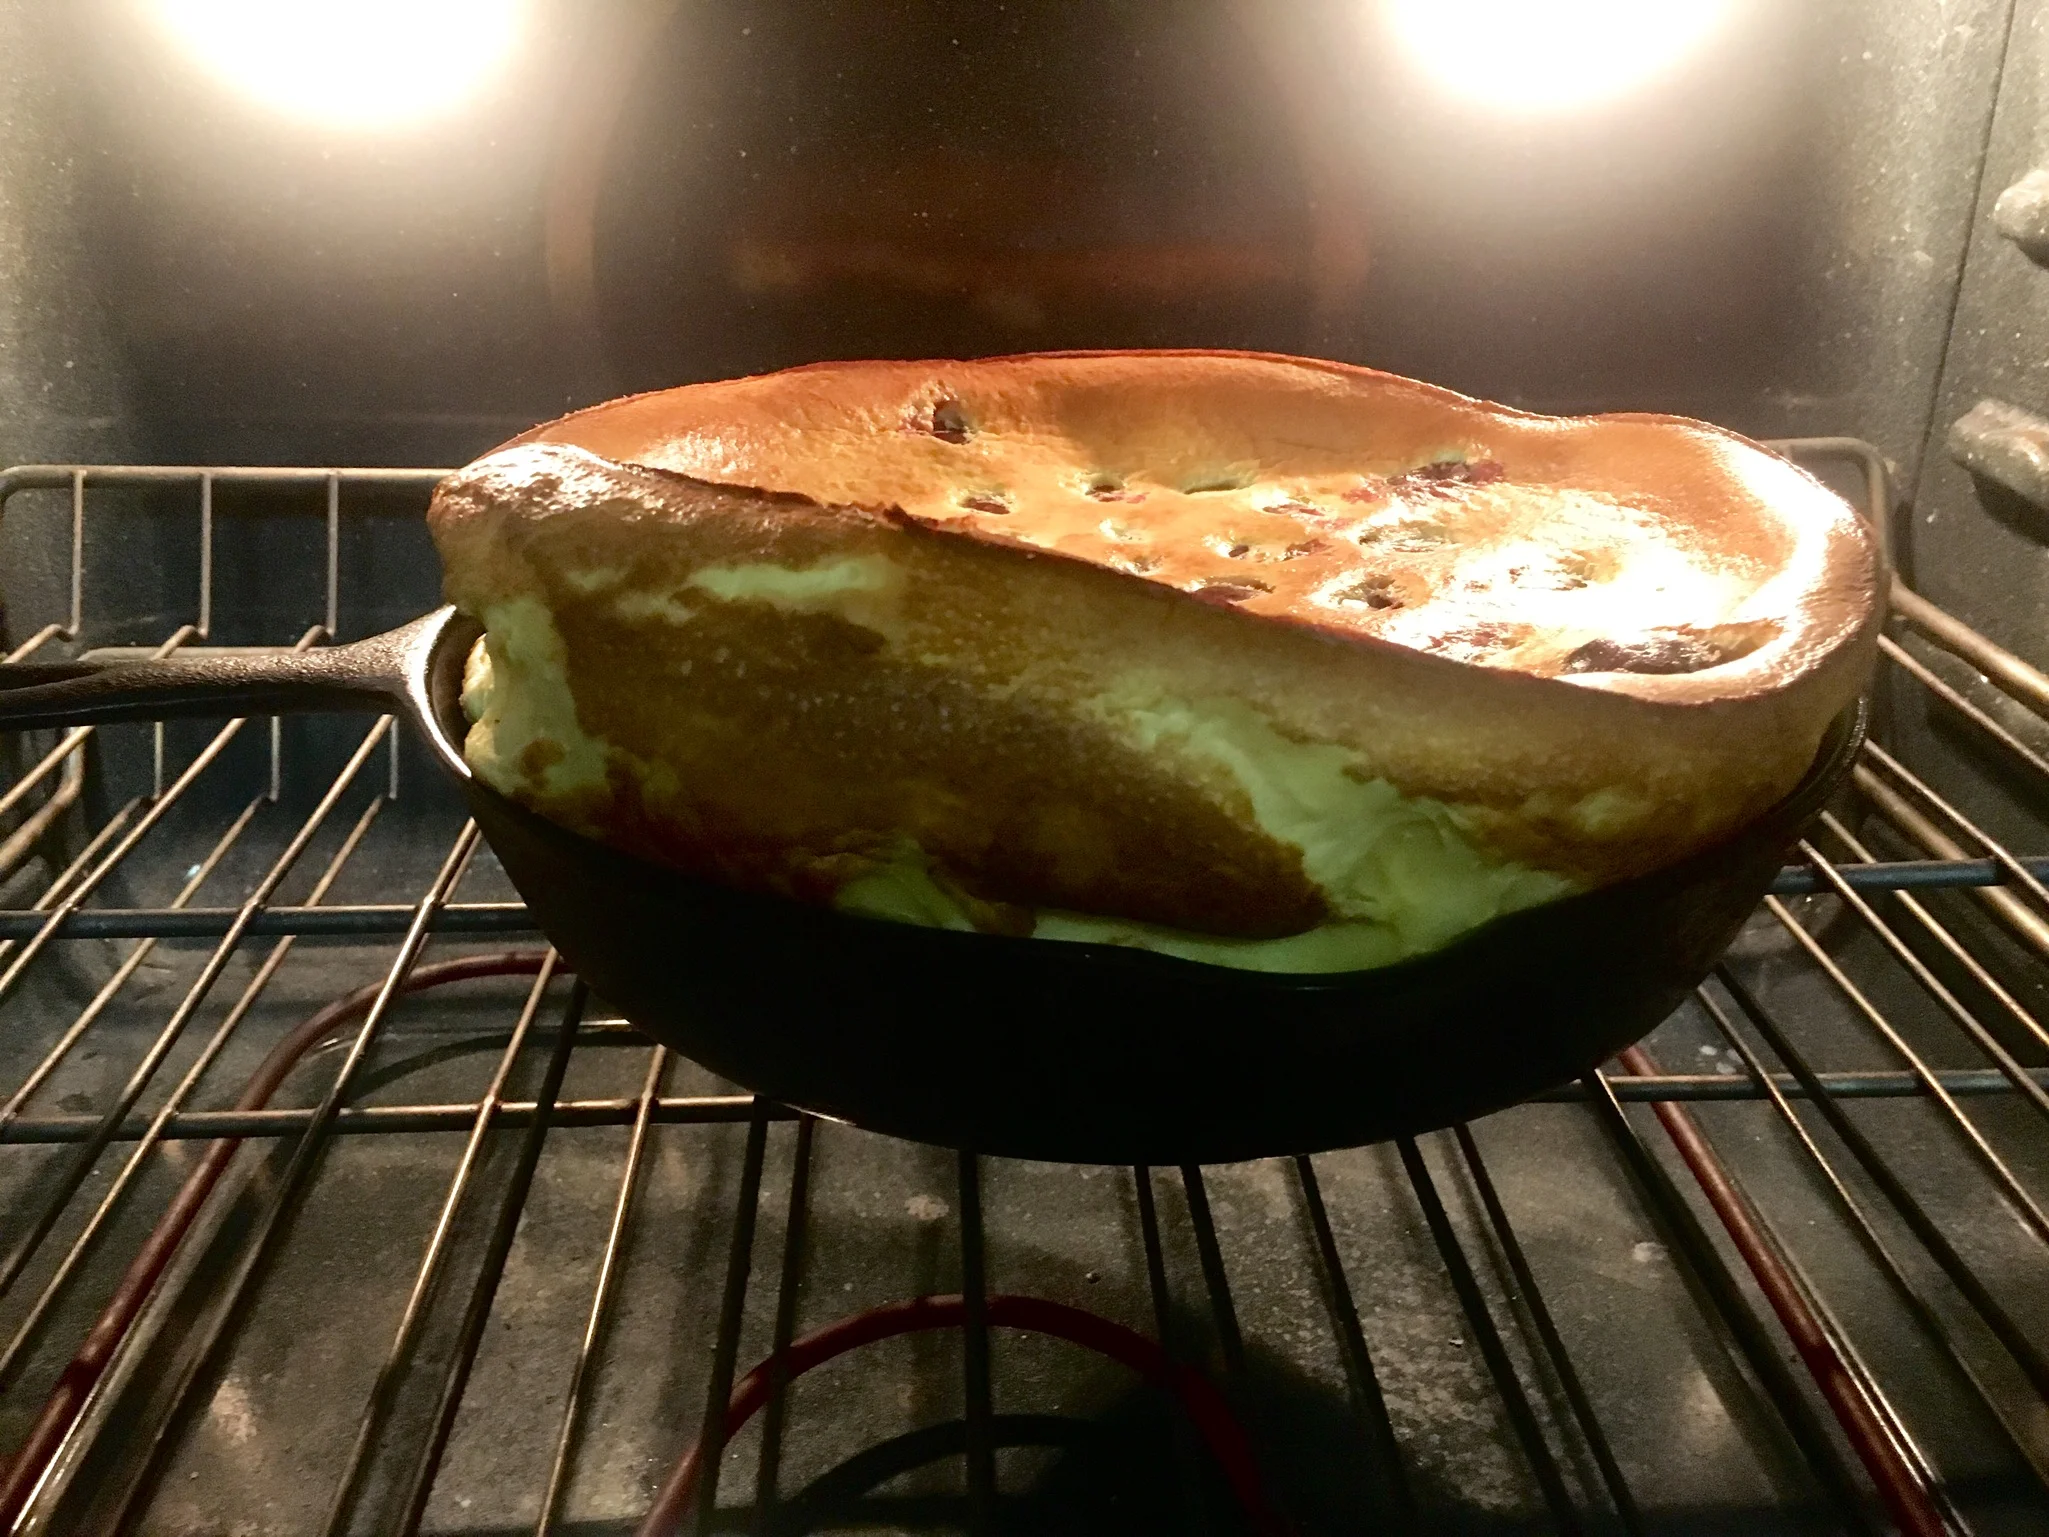
Clafoutis (pronounced kla fou TEE) is a rustic dessert, traditionally made with black cherries, eggs, milk, sugar, and flour. Clafoutis is French, but don't be intimidated. It's simple and rustic, but can be very elegant. I've made it for a dinner party and also when camping! The batter puffs up around the fruit and the edges get browned and a little crusty; it's delicious. It rises and puffs up as it bakes; much like a Dutch Baby, if you are familiar with that. The taste is a bit like a custard but it isn't as creamy. Clafoutis, served warm with a dusting of powdered sugar or a drizzle of heavy cream is one of my very favorite desserts... and once you taste it, you'll add it into your regular dessert rotation. Serve it in the skillet for an impressive presentation. If you don't have a cast iron skillet, you can also bake this dessert in a buttered baking dish but youneed to watch it carefully if you do because the timing may be different.

You can also make Clafoutis with different fruit. I like it with pears or apples, too.

Dark Cherry Clafoutis recipe

DARK CHERRY CLAFOUTIS

INGREDIENTS

1 tablespoon unsalted butter

1 tablespoon vanilla

6 eggs

6 tablespoons sugar

1 ¼ cup milk

Pinch salt

¾ cups of all-purpose flour

3 cups pitted cherries (don't get the canned cherries in heavy syrup. Use the 24.7 ozbottle of Dark Morello Cherries in light syrup, if you can find them. Drain them well. Or you can use fresh*)

Confectioners sugar (powdered sugar) for dusting

DIRECTIONS:

Preheat oven to 425 degrees. Generously butter the bottom and sides of a large cast iron skillet or baking dish.

Combine vanilla, eggs, sugar, milk, and salt in a food processor or blender. Blend for a few seconds until combined and then add the flour and blend until smooth, about 1 minute. (if you don't have a blender, you can just whisk until well combined, the sugar is dissolved, and batter is smooth. Whip it really well.)

Pour the batter into the prepared skillet. Cover the top evenly with the well-drained cherries. Bake for about 30 minutes or until a toothpick comes out clean and the top is golden brown. Don't be tempted to open the oven during baking or the Clafoutis may fall. Serve warm. Dust the top with powdered sugar or serve with a drizzle of heavy cream.

NOTE: When using fresh fruit, put the butter in the skillet and let it melt. Once it has, add about a pound of  fresh, pitted Bing cherries to the butter and let them cook to soften for about 3 minutes. Sprinkle with 2 tablespoons granulated sugar and stir until the juice thickens into a syrup. Pour the batter over the fruit and bake as directed above.

Print Friendly and PDF

RECIPE: MINI STRAWBERRY TARTS

Anything in a homemade, buttery pastry crust is always a welcome treat but the crust is perhaps even more delicious (if that is possible) with the addition of ripe and juicy locally grown fruit. Late spring in middle Alabama is strawberry season... and we've been blessed with a huge, beautiful crop of perfect strawberries this year. Here's one of the best ways I know to enjoy summer's berries and fruit. FYI-The crust can be stuffed with just about anything. Leave off the sugar for chicken pot pie or other savory dishes.

I recently made these tarts for a benefit for the No Kid Hungry/Chefs Cycle event. Everyone asked for the recipe.... so here you go!


MINI STRAWBERRY TARTS

INGREDIENTS

For the crust

1 cup all-purpose flour plus extra for flouring work surfaces

2 tablespoons granulated sugar

1/4 teaspoon kosher salt

1 stick (1/2 cup) unsalted butter, very cold and cubed

3-4 tablespoons ice water

1 beaten egg (optional, for egg wash)

For the filling:

1/2 vanilla bean

2 tablespoons unsalted butter, room temperature

1 quart fresh strawberries, washed, hulled, and sliced

1-2 tablespoons granulated sugar (taste the strawberries to see how sweet they are and use just enough sugar to sweeten slightly)

pinch of kosher salt

pinch of black pepper

2 tablespoons fresh lime juice (or lemon juice if you prefer)

1 tablespoon all-purpose flour (you may need a bit more for extremely juicy berries)

DIRECTIONS

FOR THE PASTRY:

Use a food processor. If you don't have one, you can cut the butter into the flour by using a pastry blender or two butter knives as I did when I used to cook with my mom as a child.

Lay down a large sheet of plastic wrap on the counter. Sprinkle 1/2 teaspoon of the flour over the surface.

Add the flour, sugar, and salt to the bowl of the food processor. Turn it on run for a moment to incorporate. Begin to add the butter, 2-3 cubes at a time and pulse 10 times before adding the next. Once the butter has been incorporated, turn the food processor to "on" and add the ice water quickly, but add it one tablespoon at a time. As soon as the dough comes together in a ball, turn it off immediately.

Turn the dough out onto the prepared plastic wrap. Working quickly, shape it into a disc and cover with the plastic. Move it to the refrigerator to chill for at least 1 hour before using.

FOR THE FILLING:

Scrape the vanilla bean and add the seeds to the softened butter. Set aside.

Place the strawberries, sugar, salt, pepper, and lime juice in a glass bowl and mix together well. Sprinkle the flour over the top of the berries. Allow to sit for 10 minutes.

ASSEMBLY:

Preheat your oven to 420 degrees Fahrenheit. Place the rack in the center of the oven. Line a heavy sheet pan or baking sheet with parchment paper. Sit out a wire cooling rack.

Remove the pie crust from the refrigerator. Dust flour lightly over the work surface and also flour a rolling pin. Cut the pastry disc into 4 equal pieces. Working quickly, roll each into a ball and then press it down so you may roll each into a circle shape approximately 6" in diameter. Place each on the baking sheet.

Place a fine mesh sieve or strainer over a bowl. Pour the strawberries into the strainer to remove any excess juice. Add a heaping 1/4 cup of the strawberries to the center of each tart. Fold the crust over the berries, leaving the center open.

Using a pastry brush, brush the crust with the egg wash. I also sprinkle a bit of granulated sugar on the crust. Add a pinch of the vanilla butter to the top of each tart.

Place the assembled tarts into the freezer for 5-10 minutes to chill before baking so the tarts do not spread.

Bake for 12 minutes. Turn the tarts and bake for 4 more minutes or until golden brown and bubbly. Remove the pan to a wire rack and allow to cool for at least 15 minutes before serving.

Print Friendly and PDF

RECIPE: THE BEST EVER CHOCOLATE BIRTHDAY CAKE WITH CHOCOLATE BUTTERCREAM FROSTING

Nothing says party like cake... and for me, nothing says delicious like a homemade chocolate cake. I've used this recipe for so many years, I cannot remember where I first got it. I know it did not come from my mother because she rarely made cakes and because my father didn't like chocolate, she certainly never made a chocolate cake. I started making this cake when I was in high school for parties I'd have at my house. There may have been a bakery in our neighborhood in those days but I never went to it because we made everything from scratch. There was a time when I made 7-Minute Icing for this chocolate cake but 7-minute icing is finicky and people seem to like the chocolate on chocolate better.

Make sure to use fresh baking powder and baking soda so you get a nice, fluffy cake.

PERFECT CHOCOLATE BIRTHDAY CAKE

INGREDIENTS

2 cups granulated sugar

1 3/4 cups all-purpose flour

3/4 cup cocoa powder

1 1/2 teaspoons baking soda

1 1/2 teaspoons baking powder

1 teaspoon kosher salt

2 large eggs

1 cup whole milk

1/2 cup vegetable oil

2 teaspoons pure vanilla extract

1 cup boiling water

1 recipe Chocolate Buttercream Frosting (recipe follows)

DIRECTIONS:

Heat oven to 350°F. Grease and flour three 8-inch round baking pans. (You can use Baker's Joy but I prefer the outcome using the grease-flour method)

Sift together the sugar, flour, cocoa, baking soda, baking powder and kosher salt and add it to the bowl of your mixer. With the mixer on low, add the eggs, one at a time. Add the milk, oil, and vanilla and beat on medium speed for 2 minutes. Remove from the stand. Stir in the boiling water (the batter will be thin). Pour the batter into the prepared pans.

Bake 30 to 35 minutes or until wooden pick inserted in center comes out clean. Cool 10 minutes; remove from pans to wire racks. Allow to cool completely before icing with the Perfect Chocolate Buttercream Frosting recipe below.

(For a sheet cake, use a 13x9x2 pan and bake for 35-40 minutes)


CHOCOLATE SWISS MERINGUE BUTTERCREAM

A Swiss buttercream is made using egg whites and not just butter (or shortening as some old recipes call for) to make it extra fluffy and lighter than a butter only buttercream. I like both but wanted to share this one-- or you can make traditional buttercream using just butter, powdered sugar, and chocolate. The one on the Hershey's Cocoa box is perfect. Can't go wrong with that!

INGREDIENTS

1 pound bittersweet chocolate

12 ounces semisweet chocolate

3/4 cup egg whites (4-5 extra-large eggs), at room temperature

1 1/2 cups granulated sugar

1/4 teaspoon cream of tartar

3/4 teaspoon kosher salt

1 1/2 pounds unsalted butter, room temperature

2 teaspoons pure vanilla extract

DIRECTIONS:

Chop the chocolates and place them in a heat-proof bowl set over a pan simmering water. Stir until melted and set aside until cooled to room temperature.

Mix the egg whites, sugar, cream of tartar, and salt in the bowl of an electric mixer fitted with a whisk attachment. Place the bowl of egg whites over the pan of simmering water and heat the egg whites until they are warm to the touch, about 5 minutes. Return the bowl to the electric mixer and whisk on high speed for 5 minutes, or until the meringue is cool and holds a stiff peak.

Add the butter, 1 tablespoon at a time, while beating on medium speed. Scrape down the bowl, add the melted chocolate, vanilla, and mix for 1 minute or until the chocolate is completely blended in. If the buttercream seems very soft, allow it to cool, and beat it again. If you want to make it extra special or cannot get your icing to look exactly perfect, top with chocolate curls like I did in the photo above. There are easy to make.

HOW TO MAKE CHOCOLATE CURLS

Melt some chocolate using a double boiler. Remove from the heat. Take a clean baking sheet and spread a thin layer of the chocolate onto it and place it in the freezer for 5 minutes. To make the curls, use a thin metal spatula or a clean putty knife. Press the edge of the spatula under the edge of the chocolate and push it forward... the chocolate will roll up. Place on another baking sheet lined with parchment paper and put back into the freezer to firm up. When you are ready to use, simply decorate the cake as desired... also a great garnish for ice cream!

Print Friendly and PDF